
Old homes often face significant pipe-related challenges due to age, material deterioration, and lack of modern maintenance. Common issues include leaks from corroded joints, brittle pipes, or worn gaskets, leading to water damage, mold growth, and high water bills. Regular inspection is crucial for identifying problems early and facilitating effective pipe repair, preserving the home's structural integrity.
Pipe repair methods range from traditional techniques like welding and copper soldering for metal pipes to modern options such as PVC or PEX pipes for flexibility and corrosion resistance. A well-equipped toolkit with appropriate materials tailored to different pipe types is essential.
Key steps in fixing a leaking pipe include identifying the source, gathering tools (e.g., repair kit, wrenches), turning off the water supply, removing and cleaning the damaged section, applying sealants, reassembling, testing, and confirming successful repairs.
Insulating exposed pipes in old homes is vital to prevent freezing during winter, prolonging pipe lifespan. Regular maintenance, including checking for corrosion, leaks, and discoloration, replacing old pipes, insulating, and using repair kits for minor issues, saves costs and ensures plumbing system longevity.
While DIY approaches can be cost-effective for minor repairs, complex issues often require professional plumbers with specialized tools and knowledge to comply with local plumbing codes. Regular maintenance, prompt issue addressing, and professional assistance extend pipe lifespans in old homes.
Pipe repair is an essential aspect of maintaining old homes, addressing issues that can lead to costly damage and inefficient water systems. This comprehensive guide delves into the common pipe problems found in vintage dwellings, teaching homeowners how to identify signs of damaged pipes and understand various repair methods tailored to their needs. From identifying necessary materials to step-by-step fixing leaks and insulating pipes, this article equips readers with knowledge to tackle repairs effectively while preventing future plumbing headaches.
Understanding Common Pipe Issues in Old Homes
Many old homes suffer from common pipe issues due to age, material used, and lack of modern maintenance. Leaks are a frequent problem, caused by corroded joints, brittle pipes, or worn-out gaskets. These leaks can lead to water damage, mold growth, and unexpected water bills. Additionally, old homes often have pipes made of lead or copper, which may require specialized Pipe Repair techniques due to their hazardous nature.
Another concern is pipe corrosion, especially in areas with high moisture levels. Over time, this corrosion weakens the pipes’ structure, making them more susceptible to bursts and resulting in costly repairs. Identifying these issues early through regular inspection is crucial for effective Pipe Repair and maintaining the home’s overall integrity.
Identifying Signs of Damaged Pipes

Many old homes have pipes that are at risk of damage due to age, corrosion, and changes in water pressure. Identifying signs of damaged pipes is crucial for effective pipe repair. Some common indicators include slow or inconsistent water flow, visible rust or corrosion on pipes, loud banging or rattling noises coming from the walls during water use, and low water pressure.
Regular inspection of pipes, especially in areas prone to freezing temperatures, can help catch issues early. Look for signs of moisture or mold around pipes, as these may indicate leaks. If you notice any of these symptoms, it’s important to promptly address them to prevent further damage and ensure the longevity of your home’s plumbing system through effective pipe repair.
Types of Pipe Repair Methods for Vintage Homes
When it comes to repairing pipes in old homes, there are several methods to consider. One common approach is pipe repair using traditional techniques such as welding or copper soldering. These methods are ideal for restoring metal pipes and can be effective for both copper and steel piping. Welding involves fusing the pipe sections together, while soldering uses a molten alloy to join the pipes, offering a durable and leak-free seal.
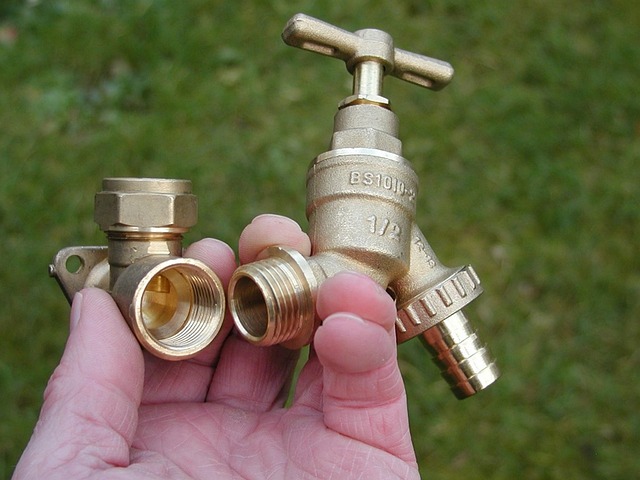
Another popular option is using modern replacement parts, like PVC or PEX (cross-linked polyethylene) pipes. Pipe repair with these materials often involves fitting new sections into existing piping or replacing entire runs. PVC and PEX are known for their flexibility, corrosion resistance, and ease of installation, making them suitable for both residential and commercial properties. These modern alternatives can be a game-changer when dealing with old homes, offering cost-effective solutions that require less labor and maintenance over time.
Materials Needed for Repairs: A Comprehensive List

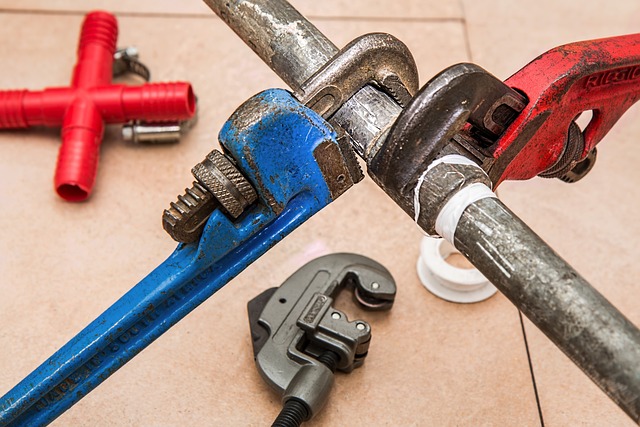
When undertaking pipe repair in old homes, having the right materials is paramount for a successful and lasting fix. This includes a variety of tools and components to address different types of leaks or damage. For metal pipes, you’ll need replacement sections, thread tape or pipe dope, couplings, and joint compound. For plastic pipes, consider replacing damaged segments with new PVC or CPVC pipes, along with appropriate primer and glue. Don’t forget about the essential tools like pipe wrenches for tight connections, a hacksaw for cutting pipes to size, and leak-detecting solutions to ensure your repairs are effective. Additionally, having a stock of repair clamps and elbow joints can help manage various pipe configurations.
Step-by-Step Guide to Fixing Leaking Pipes
Fixing a leaking pipe is an essential part of maintaining an old home, and with the right approach, it can be a straightforward task. Here’s a step-by-step guide to help you get started. Begin by locating the source of the leak; check for common areas like joints, valves, or pipes under sinks and fixtures. Once identified, gather your tools: a new pipe repair kit, including thread tape or pipe dope, a wrench or pliers, and replacement pipes if necessary.
Turn off the water supply to the affected area using the shut-off valves beneath the sink or fixture. With the water turned off, you can now proceed with the repair. Remove the damaged or leaking section of pipe, clean the joints, and apply thread tape or pipe dope to create a secure seal. Reassemble the pipe, ensuring all connections are tight, and turn on the water supply to test the repair. If there’s no leak, your pipe repair is successful!
Insulating Pipes: Why and How It's Done

Insulating pipes is an essential step in pipe repair for old homes, offering numerous benefits beyond just temperature regulation. In older buildings, pipes are often exposed or run through uninsulated walls and ceilings, making them susceptible to temperature fluctuations. This can lead to issues like frozen pipes during winter, resulting in costly damage from burst pipelines. Insulation acts as a protective layer, maintaining consistent temperatures and preventing these problems.
The process involves wrapping insulation material around the pipes or using specialized pipe insulation kits. It’s crucial for both hot and cold water pipes, especially those in attics, basements, or exterior walls. Proper insulation is a key component of effective pipe repair, ensuring the longevity of plumbing systems and avoiding costly repairs down the line.
Preventing Future Pipe Problems in Older Houses
Regular maintenance and inspections are key to preventing future pipe problems in older homes. Start by checking for any signs of corrosion, leaks, or discoloration around pipes and fittings. Addressing these issues promptly can prevent more severe damage down the line. Consider replacing old, rusted pipes with modern materials that offer better insulation and longevity.
In addition to regular checks, insulating exposed pipes during colder months can prevent freezing and burst pipes. Using pipe repair kits for minor cracks or leaks is an effective, cost-efficient solution. Regular maintenance not only saves you from costly repairs but also ensures the longevity of your home’s plumbing system.
Hiring a Professional Plumber vs DIY Repair
When it comes to pipe repair in old homes, one of the key decisions homeowners face is whether to hire a professional plumber or attempt DIY repairs. While DIY can be appealing for its cost-effectiveness and perceived simplicity, especially for minor issues like leaky faucets or clogs, it often falls short when dealing with complex pipe repair work. Old homes typically have intricate plumbing systems that may involve narrow spaces, tight angles, and outdated materials, making do-it-yourself repairs challenging and potentially risky.
Hiring a professional plumber offers several advantages. These experts are equipped to handle a wide range of pipe repair issues, from replacing corroded pipes to fixing broken joints, with the right tools and knowledge. They can also identify potential problems that may not be immediately apparent to an untrained eye, preventing future disruptions or costly damage. Moreover, professional plumbers ensure that any repairs comply with local plumbing codes, safeguarding your home’s value and ensuring safe water supply and waste removal systems.
Tips for Maintenance and Extending Pipe Lifespan
Regular maintenance is key to extending the lifespan of pipes in old homes. Start by inspecting pipes visually for any signs of damage, corrosion, or leaks. Addressing issues early can prevent further complications. Keep an eye on areas prone to moisture, like basements and bathrooms, as these are hotbeds for pipe deterioration.
Consider implementing a preventive strategy involving regular cleaning and flushing. Sediment buildup can lead to clogs and reduced water flow, so periodic flushing helps maintain optimal performance. Additionally, using insulation in colder climates can safeguard pipes from freezing, expanding, and bursting due to temperature fluctuations. Pipe repair should always be a priority for homeowners to ensure the longevity of their plumbing systems.