Faucets, despite their simplicity, can face various issues like leaks, low pressure, and temperature control problems caused by worn parts or mineral buildup. While minor repairs can be handled by homeowners using basic tools and replacement components, complex jobs require professional assistance to avoid further damage. Understanding faucet components, proper tool selection, and following a structured repair guide ensure successful DIY fixes. Regular maintenance, including sealing and cleaning, is crucial for long-term faucet health. Severe cases demand professional plumbers for specialized repairs.
Looking to tackle that leaky faucet yourself? This comprehensive guide covers everything you need to know about residential faucet repair. From identifying common issues like leaks and low water pressure, to step-by-step instructions for replacement parts and sealing techniques, we’ve got you covered. Learn which tools and materials are essential, understand the various components of your faucet, and when it’s time to call a professional plumber. Master these skills and save money while keeping your home running smoothly.
Understanding Common Faucet Issues

Faucets, though seemingly simple, can present various issues over time. Common problems include leaks from spouts or bases, low water pressure, and erratic temperature control. Leaks, often caused by worn-out O-rings or cartridges, can waste significant amounts of water and lead to higher water bills. Low water pressure might be due to mineral buildup in the aerator or a faulty water line, while temperature control issues could result from damaged valves or incorrect settings.
Identifying these problems is the first step towards effective faucet repair. Homeowners can often address minor issues themselves using simple tools and replacement parts. However, for more complex repairs, such as those involving intricate valve mechanisms or hidden pipes, professional assistance may be required to ensure proper fixing and prevent further damage.
Gather Tools and Materials for Repair

Before starting any faucet repair, it’s crucial to gather the right tools and materials. For most residential faucet repairs, you’ll need a few basic tools like adjustable wrenches, pliers, and a new faucet O-ring or washer. It’s also helpful to have a bucket for soaking parts and some rags or old towels to catch any residual water. Specific tools may vary depending on your faucet model, so refer to your owner’s manual if needed.
When it comes to materials, ensure you purchase replacement parts that are compatible with your faucet. Look for O-rings, washers, cartridges, or valves specific to your faucet brand and model. Avoid generic replacements unless you’re certain they’ll fit properly, as incorrect parts can lead to leaks or other issues. Having the right tools and materials will make your faucet repair smoother and more successful.
Identifying Faucet Parts and Their Functions

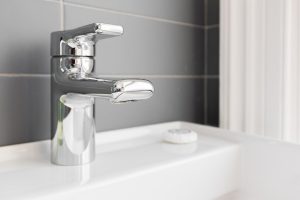
When it comes to faucet repair, understanding the various parts and their functions is essential. The faucet, a staple in every residential kitchen and bathroom, consists of several components working in harmony to control water flow and temperature. Key parts include the handle, cartridge, washer, O-ring, and valve seats. Each serves a specific purpose: the handle operates the faucet’s on/off mechanism; the cartridge regulates water pressure and temperature; washers and O-rings ensure water doesn’t leak out; and valve seats create a seal to stop water flow when the faucet is turned off.
Identifying these parts is crucial for effective faucet repair. Visual inspection can often help in recognizing damaged or worn-out components, guiding you on which ones to replace. Consult your faucet’s manual for detailed diagrams and descriptions of each part, making it easier to navigate the repair process. Knowing their functions not only facilitates efficient troubleshooting but also empowers homeowners to tackle basic repairs, saving time and money.
Step-by-Step Guide to Fixing Leaking Faucets
Leaky faucets are a common household issue, but fixing them is straightforward and can save you money on your water bills. Here’s a step-by-step guide to help you tackle this problem. First, turn off the water supply to the faucet by locating and closing the corresponding shut-off valves under the sink. This prevents any water from continuing to flow while you work. Next, gather the necessary tools: a wrench or pliers for removing components, replacement parts if needed (such as O-rings or washer cartridges), and a bucket to catch any loose debris.
Disassemble the faucet by unscrewing the handle and lifting it off. Behind the handle, you’ll find the cartridge or valve assembly. Remove this carefully, taking note of how it’s assembled, as it can vary between different faucet models. Inspect the parts for wear or damage, especially the O-rings and washers. Replace any worn components with new ones supplied in a repair kit. Once all parts are replaced, reassemble the faucet, ensuring each component is securely fastened. Finally, turn on the water supply and test the repair by checking if the leak has stopped.
Troubleshooting No Water Flow Problems

When dealing with a residential faucet repair, one of the most common issues homeowners face is no water flow. Troubleshooting this problem can often be straightforward and save you time and money. Start by checking the obvious—ensure all supply lines are turned on and securely connected to both the faucet and the shut-off valves under the sink. A simple turn of a valve can sometimes fix an intermittent or completely blocked water flow.
If the lines appear fine, try clearing any debris or mineral buildup in the aerator, the small screen at the tip of the spout. Mineral deposits can significantly restrict water flow. For more complex issues, such as faulty cartridges or damaged internal parts, a thorough inspection and possibly replacing these components might be necessary. Regular maintenance, including cleaning and checking for leaks, can prevent future faucet repair needs.
Replacing Old or Damaged Faucet Handles
When it comes to faucet repair, replacing old or damaged faucet handles is a common task for homeowners. Over time, these handles can become worn out, chipped, or simply lose their grip, making them hard to turn or even break off entirely. Instead of dismissing them as minor inconveniences, addressing these issues promptly is essential for maintaining proper plumbing and preventing further damage.
To replace your faucet handles, you’ll need a few basic tools like pliers, a screwdriver, and new handles that are compatible with your faucet model. First, turn off the water supply to avoid leaks or flooding. Then, remove the old handles by unscrewing them counterclockwise using the appropriate tool. Once removed, inspect the faucet spout for any damage or debris, clean it if necessary, and carefully install the new handles, ensuring they are securely fastened.
Sealing and Maintaining Your Repaired Faucet
After successfully repairing your faucet, proper sealing and maintenance are crucial to ensure its longevity and prevent future issues. The first step is to verify that all parts are securely fastened and sealed to avoid any leaks. Use the appropriate sealing compound or caulk around the base of the faucet where it connects to the sink surface, ensuring a watertight seal. Regularly inspect your repaired faucet for any signs of damage, corrosion, or loose connections.
Maintenance includes periodic cleaning to remove mineral deposits and limescale buildup, which can affect water pressure and flow. A simple solution of vinegar and water can be used to clean the faucet components, while soft cloths or brushes can help remove stubborn residue. Additionally, keeping an eye on the faucet’s performance will allow you to promptly identify any unusual noises or reduced water pressure, enabling early intervention should issues arise.
When to Call a Professional Plumber

If your faucet repair involves issues that extend beyond simple troubleshooting, it might be time to call in a professional plumber. While minor leaks or clogs can often be resolved with DIY methods, complex problems require specialized knowledge and tools.
Some signs indicating a need for professional intervention include severe water damage, unusual noises coming from the pipes, or if your faucet is showing symptoms of corrosion or significant wear and tear. Professional plumbers are equipped to handle these scenarios effectively, ensuring long-lasting solutions that prevent future complications.