
Concrete slab cracks vary in type and severity, from minor hairline fissures to significant structural damage. Understanding crack patterns helps identify issues like settlement or foundation problems. Effective crack repair requires assessing severity, addressing causes, and using suitable materials. Key tools include crack repair compounds, trowels, safety gear, and sometimes specialized equipment for deeper cracks. Best practices involve thorough inspection, prompt repair, high-quality materials, and regular maintenance to prevent future damage. Common mistakes to avoid include inadequate preparation, incorrect compound choice, overlooking crack depth, and neglecting ongoing maintenance like sealing and drainage.
Concrete floor slab cracks can weaken structural integrity and compromise the aesthetics of any property. Understanding crack types, causes, and severity is crucial for effective repair. This guide covers everything from identifying damage patterns to best practices and common mistakes to avoid during crack repair. Learn which materials and tools are essential and follow a step-by-step approach to ensure long-lasting repairs. Additionally, discover maintenance tips to prevent future slab cracking.
Understanding Concrete Slab Cracks: Causes and Types
Concrete slab cracks can range from minor surface fissures to significant structural damages, and understanding their causes is essential for effective crack repair. These cracks often result from various factors, including settlement, shrinkage, and movement of the underlying soil. When concrete sets, it shrinks slightly, leading to tiny cracks as it adjusts to its new shape. Additionally, changes in temperature and humidity can cause concrete to expand and contract, putting stress on the slab and potentially creating cracks. Settlement occurs when the soil beneath the slab compresses differently due to factors like poor compaction or changing water levels, resulting in uneven sinking and visible cracks.
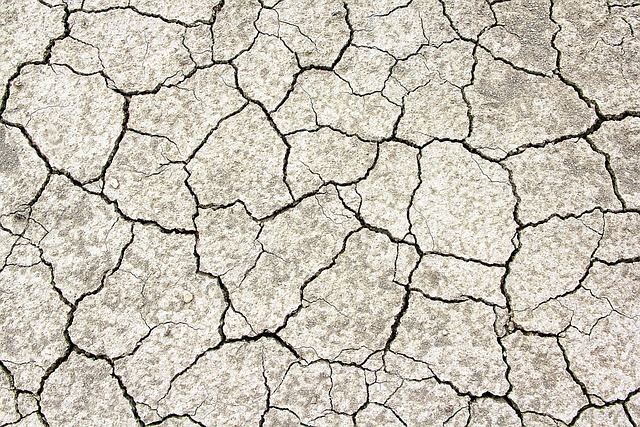
There are several types of concrete slab cracks: hairline cracks, diagonal cracks, vertical cracks, and horizontal cracks. Hairline cracks are thin, shallow, and often appear as fine lines on the surface. Diagonal cracks slope downward from a corner, usually indicating environmental stress. Vertical cracks run straight up and down, potentially signaling structural issues. Horizontal cracks, common in older slabs, indicate significant settlement or movement of the foundation. Proper crack repair depends on identifying the type and cause, ensuring that any solution addresses the underlying problem to prevent future damage.
Assessing the Damage: Identifying Crack Patterns and Severity

When assessing concrete floor slab damage, crack patterns play a pivotal role in understanding the severity and best course of action for repair. Different types of cracks – whether they are hairline, diagonal, vertical, or horizontal – can indicate distinct underlying issues, from minor settling to more serious structural problems. Carefully observing the crack pattern and its width is crucial. Narrow, shallow cracks often signal minimal movement and may only require cosmetic fixes like sealing or filling. Wider, deeper cracks, especially those that radiate from a central point, could be indicative of more significant structural damage that might necessitate more intensive crack repair methods, such as carbon fiber reinforcement or even slab replacement.
Documenting the extent of cracking with photos is essential for tracking progress during the repair process. This visual record helps in comparing before-and-after results and ensures that any new cracks developing are promptly identified. By thoroughly analyzing crack patterns and severity, you can make informed decisions about how to effectively address concrete floor slab repairs, ensuring a stable and safe surface for years to come.
Materials and Tools Required for Repair

To successfully undertake concrete floor slab repair, several key materials and tools are essential. The first step is to gather crack repair compounds designed specifically for concrete, along with a compatible jointing or filling compound. A trowel, often used for applying sealants and coatings, will be valuable for spreading the compounds evenly. Additionally, you’ll need a chisel and hammer set for removing loose concrete around the cracks and preparing the surface. Safety goggles and gloves are crucial for protection during the repair process, especially when handling sharp edges and working with chemicals. A mixing paddle or drill attachment may also be required to thoroughly combine the repair compounds.
For larger cracks, a crack-widening tool can help open up the split, allowing better compound penetration. These tools ensure that the repair holds firmly in place. Moreover, a pressure washer might be needed to clean the slab, removing any dirt or debris that could hinder the repair process and the long-term durability of the fix. Lastly, a moisture meter is beneficial for assessing the concrete’s moisture content, as this can impact the choice and application of the crack repair compound.
Step-by-Step Guide to Repairing Concrete Slab Cracks

Repairing concrete slab cracks is a process that, when done correctly, can extend the life of your structure and prevent further damage. Here’s a step-by-step guide to help you tackle this common home maintenance task.
1. Inspect and Assess: Start by thoroughly inspecting the crack to determine its size, depth, and severity. Smaller cracks (less than 1/4-inch wide) can often be repaired with simple methods like epoxy injection or filling with a concrete patching compound. For larger cracks, you might need more advanced techniques such as carbon fiber reinforcement or structural repair methodologies.
2. Clean the Area: Before beginning any repairs, clean the crack and its surrounding area to remove debris, dust, oil, and other contaminants that could hinder the new material’s adhesion. Use a wire brush or sandpaper to scrub the surface, ensuring it’s free from any loose concrete.
3. Prepare the Crack: If the crack is deep, use a chisel and hammer to carefully remove any loose concrete from the depth of the crack, creating clean edges. This step ensures that your repair material will bond securely with the existing concrete.
4. Apply Repair Material: Depending on the size and type of crack, inject a suitable crack-repair compound or epoxy into the crack using a caulk gun. For wider cracks, consider using a mesh or fabric reinforcement to strengthen the repair. Make sure the material is level with the surrounding concrete for a seamless finish.
5. Smooth and Finish: Once the repair material has set according to the manufacturer’s instructions, use a trowel or jointing tool to smooth and level the surface, ensuring it matches the texture of the surrounding concrete.
Best Practices for Ensuring Long-Lasting Repairs

When undertaking concrete floor slab repair, adhering to best practices is paramount to ensure long-lasting results. The first step involves thorough inspection to identify the extent of damage, which could range from cracks to uneven surfaces. Using advanced diagnostic tools can help pinpoint weak spots, enabling targeted repairs. Once identified, crack repair should be a top priority. Filling and sealing cracks promptly prevents further damage and water penetration, which is crucial for maintaining structural integrity.
Choosing the right materials is another key consideration. High-quality epoxy resins or polyurethane foams are recommended for crack repair due to their durability and ability to bond well with concrete. Proper preparation of the slab surface before application ensures a strong bond, extending the lifespan of repairs. Regular maintenance, including regular cleaning and inspection, can also contribute significantly to the longevity of floor slab repairs.
Common Mistakes to Avoid During the Repair Process
When repairing a concrete floor slab, avoiding common mistakes is crucial for long-lasting results. One of the biggest blunders to steer clear of is neglecting proper preparation. Before starting any crack repair, ensure the surface is clean, free from debris, and dry. Using faulty or subpar materials can also lead to future issues. Opt for high-quality epoxy or polyurethane compounds designed specifically for concrete repairs. Mixing these incorrectly or using outdated products may result in weak bonds and premature failure of the repair.
Another mistake to avoid is hasty patching. Taking your time and thoroughly assessing the crack’s depth and width ensures a more effective repair. Deep cracks might require additional steps like cleaning out the voids before filling, while wider cracks may need a reinforcement mesh for added strength. Ignoring these details could compromise the integrity of the repaired area.
Maintenance Tips for Preventing Future Slab Cracking
Regular maintenance is key to preventing future slab cracking. One of the best ways to protect your concrete floor slabs is to ensure proper drainage around the foundation of your property. Preventing water accumulation near the base of walls and structures can significantly reduce the risk of cracks forming due to frost heave or moisture-related expansion. Additionally, monitoring for any signs of settling or uneven floors should be a priority. Regularly inspecting your concrete slabs for even wear and potential stress points can help you address issues early on before they lead to costly crack repairs.
Another essential maintenance tip involves sealing and protecting the slab surface. Applying a high-quality sealant after initial curing can create a protective barrier against moisture, chemicals, and environmental damage. Regular cleaning and resealing, especially in areas with heavy foot traffic or exposure to harsh elements, will prolong the life of your concrete slabs and reduce the likelihood of future crack repair needs.